Much to tell about Premiere Elements and "About Styles". Entrance into the topic will be by way of Premiere Elements 11* Titler and its Text, Styles, and Shapes sections. The fourth of its sections, Animation, has already been detailed in a recent blog post.
The focus here will include
- Applying Adobe's default Style to text and shapes, and using other built in Styles choices in the Style section on a non-default basis
- Setting alternative default Style from Adobe's built in Styles in the Style section
- Creating and saving User Created Style, and Setting it as Default Style
SOLUTION
In doing it is hoped that answers would be generated as to what about "About Styles".
OBSERVATIONS
Applying Adobe's default Style to text and shapes, and using other Adobe built in Styles in the Style section on a non-default basis
The Titler opens with the Text section revealed, and the Titler monitor showing "Add Text" already typed using the Adobe set default Style which is named "Default Caslon Pro 68", one of 115 different Styles that are found in the Styles section of the Titler. Each Style there includes predetermined font, font size, stroke, color, or drop shadow. These Styles can be applied to shapes drawn in the Titler as well as text typed there. In the case of the Styles applied to Shapes, the font and font size do not apply. The Shapes types include rectangle, ellipse, rounded rectangle, and line.
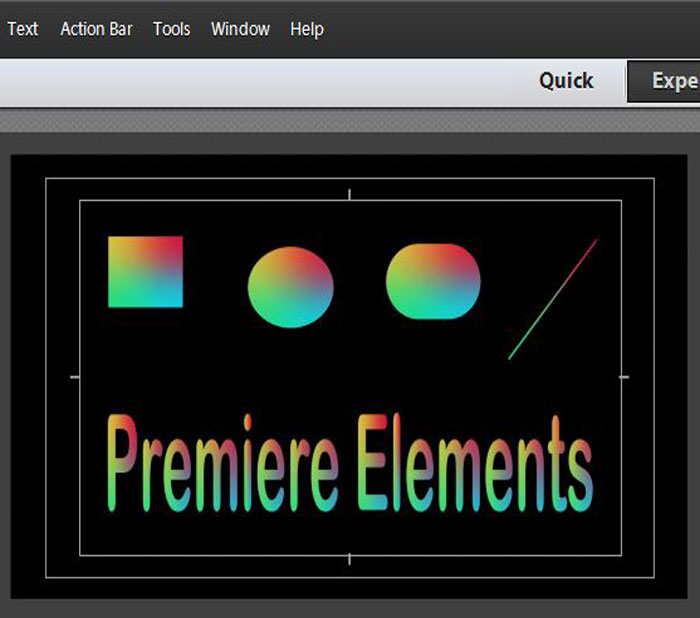
Compare
- text and shapes created in one title file with the Adobe set default Style of "Default Caslon Pro 68"
- the "Default Caslon Pro 68" text and shapes selected and a new non default style applied to them
 | |
| Figure 1. Text & Shapes. Style "Default Caslon Pro 68". |
 |
| Figure 2. Text & Shapes. Style "Lithos Gold Strokes 52" |
 |
| Figure 3. Text & Shapes. Style "Tekton Pro Yellow 93" |
In addition, the "Lithos Gold Strokes 52" with the 52 font size, appears to have a larger font size than the Default Caslon Pro 68. The "Tekton Pro Yellow 93" with the 93 font size appears to have a smaller font size than the Default Caslon Pro 68. So, for the examples in Figures 2 and 3, it became necessary to
- Go back to the Text section, select the Selection Tool
- Use the Selection Tool to select the text, use the bounding box of the text to resize and reposition it (the font size adjustment was not reflected in the Text section, font size remained in the Text section with the readout of 68).
Setting alternative default Style from Adobe's built in Styles in the Style section
The Adobe set default Style of "Default Caslon Pro 68" can be changed so that every time text is typed or shape is created in the Titler it will have this newly set default Style including font, font size for text, and stroke, color, drop shadow for text and shape. What may seem a bit confusing is that "Default Caslon Pro 68" retains its name even when a new default Style is set, and this new default Style does not include "default" anywhere in its name. To create a new default style
- Open the Titler
- Go to the Styles section, left click the new choice to select it, putting a blue border around it, then right click the new choice, and the select "Set Style As Default".
- Close the Titler. (See Close arrows in Figure 4.) Then open the Titler. Go to the Text section to verify that the font name and font size of the new default is shown when ready to type new text.
 |
| Figure 4. Setting "Caslon Red 84" As New Default |
When the Titler is reopened after this change in Style default and a new title created with "Caslon Red 84" Style as default, the expected results are as displayed in Figure 5.
 |
| Figure 5. Results Using "Caslon Red 84" As New Style Default |
The new Style Default appears to remain in effect thereafter either within the project
- when creating a new title in a project
- when editing a title that was created before the change of default Style
Creating and saving user created Style and Setting it as Default Style
A Style can be created by the user in the Titler, using its Text section for the creation and its Style section for the Save Style as well as Set Style As Default. Here is one example of how it might be done:
STEP 1
Open the Titler to the Text section, select and set Font, Size, and add Color to the text.
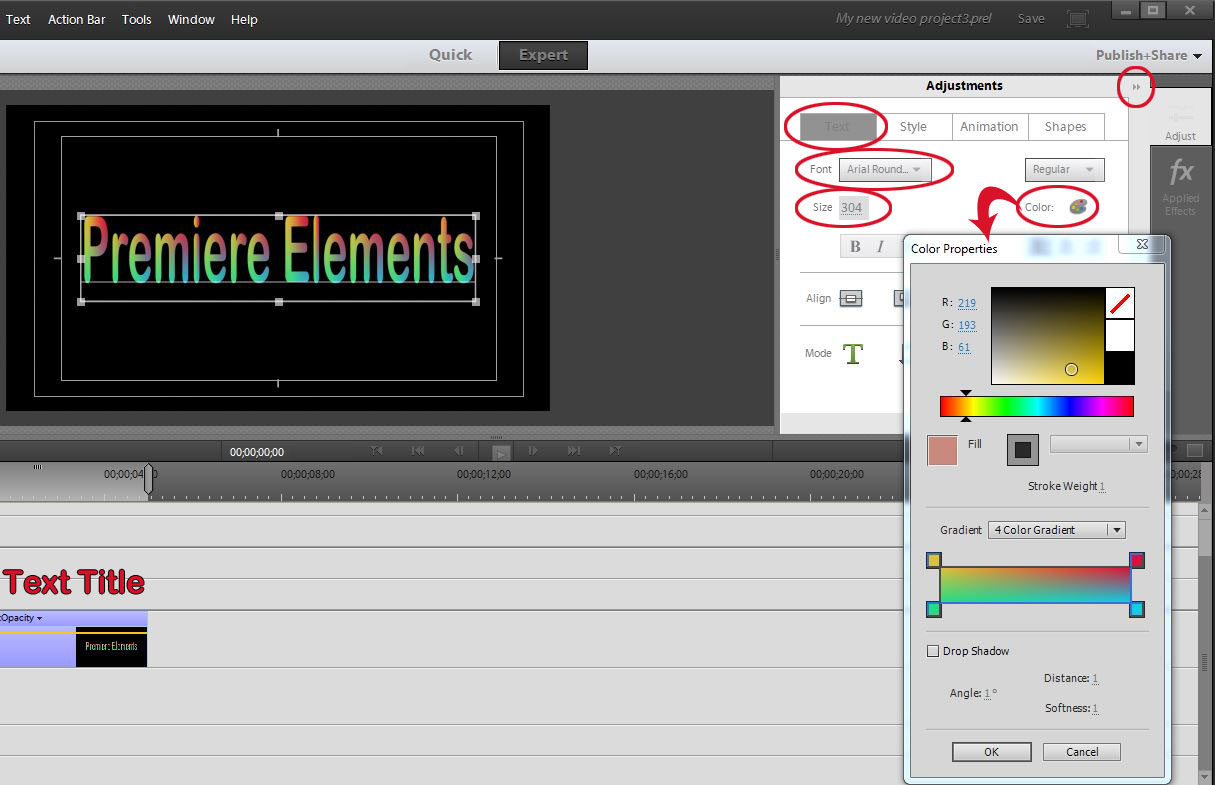 |
| Figure 6. User Created Style In Titler Text Section In Progress |
In the example shown in Figure 6, Font = Arial Rounded MT Bold, Size = 392. Color Properties dialog was used to add a 4 Color Gradient to the Text which was Premiere Elements. In this instance, the Fill and Stroke where not available in Color Properties. Please refer to the Adobe document "Premiere Elements/Adding Color and Shadows to Titles" for a full discussion of Set the Fill and Set the Stroke in Color Properties.
STEP 2
When the user Style is completed in the Text section and the text is selected with the Text section's Selection Tool, click on the Style Tab to open that section. In that section, right click anyone of the Styles thumbnails there and select "Save Style" from the pop up menu.
IMPORTANT. At no time, left click the Style thumbnail so that there is a blue border around it. See Figure 7.
 | |
| Figure 7. User Created Style. Save Style. |
STEP 3
Click OK to the Save Style dialog for the new "Arial Rounded MP Bold Red 304" Style. A thumbnail for the new Style will appear in the display of Adobe built in Styles thumbnails (typically to the bottom of the other thumbnails). The User Created Style thumbnail can be distinguished from the Adobe built in ones by the presence of a white border above and below the displayed Aa representation of the Style.
Tip. That Aa representation in the Style thumbnail can be changed to another 2 characters in Edit Menu/Preferences/Titler if wanted. But, at this time, no advantage is seen in that.
 |
| Figure 8. User Newly Created Style Displayed In Styles Section |
If the User Created Style is wanted as the default Style, then left click its thumbnail to select it (place a blue border around it), and then right click the thumbnail and select "Set Style As Default". The new default should go into effect after the Titler is closed with the arrow pair at the top right of the Titler. So close the Titler, reopen it, and create a new title. Refer to above section named "Setting alternative default Style from Adobe's built in Styles in the Style section" for applicable further details.
STEP 4
When the "Atrial Rounded MT Bold 304"is set as default, the expected results are as displayed in Figure 9.
 |
| Figure 9. User Created Style "Atrial Rounded MT Bold 304" |
*Premiere Elements 11 on Windows 7 Professional SP1 64 bit was used in this study. Premiere Elements 11 project preset was set manually for NTSC DV Standard. Premiere Elements 10 under the same conditions gave comparable choices and results, but in the older style workspace representative of Premiere Elements versions earlier than 11. See Figure 10.
 |
| Premiere Element 10. Titler. "Default Caslon Pro 68" Style |