Premiere Elements* offers a burn to folder option as well as burn to disc for DVD and AVCHD, but offers only burn to disc for Blu-ray. So, there are those of us who have sought a substitute for the non existent burn to folder for Premiere Elements Blu-ray as well as a way to create a disc image for DVD, AVCHD, and Blu-ray. For many, the answer to this situation has come from the use of the virtual DVD/BD burner (Phantom Burner) with a virtual disc (DVD+RW or BD-RE) in conjunction with Premiere Elements "burn to" to create the disc image in .VDD or .ISO format.
After installing the Phantom Burner software, it becomes available as a separate computer drive which is recognized by Premiere Elements burn dialog in the burner location field. Typically the resulting disc image (.VDD or .ISO) is taken to disc with 3rd party software such as ImgBurn to give the DVD-VIDEO on DVD disc, AVCHD on DVD disc, or the Blu-ray disc format on Blu-ray disc. In addition, it was discovered that certain possibilities exist for importing the disc image into a Premiere Elements project by mounting it in the Phantom Burner drive and then importing it into Premiere Elements 12 using the Premiere Elements Add Media/"DVD camera or computer drive"/Video Importer (Source field set to Phantom Burner drive). This path results in VOB (in case of DVD disc image .VDD or .ISO) or .m2ts (in case of AVCHD or Blu-ray disc image .VDD) in Project Assets as well as on the Timeline.
Interestingly, some Premiere Elements 11 Editor (Mac Only) product information seems to show that there is a burn to "ISO Image" choice in the Publish+Share/Disc/DVD choices in that particular version of Premiere Elements. That is another story for another time. Focus in this blog post will be on the Premiere Elements Windows side of the matter. The concepts will be demonstrated using Premiere Elements 12 on Windows 7 Professional SP1 64 bit, but, in principle, are applicable to earlier versions of Premiere Elements.
ISSUE
How to create DVD-VIDEO/DVD, AVCHD/DVD, and Blu-ray/Blu-ray disc images using Premiere Elements and the virtual Phantom Burner with a virtual DVD+RW or BD-RE disc? And, what can you do with it once you have it?
SOLUTION
Although the Phantom Burner Premiere Elements How To is fairly straight forward for the .VDD or .ISO image creation and its use when dealing with DVD-VIDEO, tips are needed to get Blu-ray BD-RE opportunities to work.
Keys to overcoming the AVCHD and Blu-ray glitches typically include:
- for Blu-ray BD-RE, ignoring "device error" message which appears instead of "Burn Complete!" message at the end of the Premiere Elements burn to using the Phantom Burner with its virtual disc BD-RE.
- for AVCHD DVD or Blu-ray BD-RE, using the .VDD format instead of the .ISO format of the disc image if trying to import the Phantom Burner Premiere Elements created disc image as media into another Premiere Elements project to obtain the m2ts in Expert workspace Project Assets/Timeline
- for Blu-ray BD-RE, not deleting the .VDD.001 file that is the companion for the .VDD file, if the specific goal is to import the Phantom Burner Premiere Elements created disc image .VDD as media into another Premiere Elements project to obtain the .m2ts in Expert workspace Project Assets/Timeline
- for AVCHD DVD or Blu-ray BD-RE disc image .VDD format, selecting "All Files" instead of "Supported Files" when browsing for the .VDD disc image in the 3rd party software to get the disc image to disc.
HOW TO
DVD
STEP 1 is to download and install the Phantom Burner.**
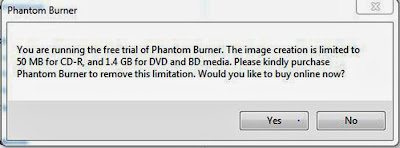
This should get you through most of the evaluation of the technique. You will get a message in a subsequent step, giving you size limits for use before you need to BUY.
50 MB CD-R
1.4 GB DVD & BD Media
Phantom Burner 2.0 was used in these studies on Windows 7 Professional SP1 64 bit.
STEP 2. After Phantom Burner installation, go to Computer where you will now find a drive icon and letter for your Phantom Burner. Think of this Phantom Burner software installation as equivalent to installing physically an internal or external CD/DVD or Blu-ray burner to your computer.
STEP 3. Now for getting a "disc" in this virtual burner.....when you get to the burn dialog in Premiere Elements, the program is going to be looking for a disc in the Phantom Burner before it shows Status = Ready in the Publish+Share/Disc/DVD disc burn dialog. The Phantom Burner's answer for getting a virtual disc into its burner is to right click the Phantom Burner drive icon shown with the other drives under Computer in order to obtain the drop down list where Create Image is included (Refer to Figure 1a.)
 |
| Figure 1a. Windows 7 64 bit Computer. Phantom Burner Drive F. Create Image. |
 | ||||
| Figure 1b. Windows 7 64 bit Computer. Phantom Burner Drive. Tryout Limitations. Decision To Buy Or Continue On Tryout Basis. |
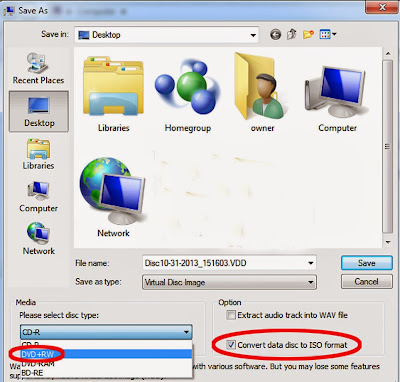
After clicking "No" so that you can continue the tryout, the following Save As dialog appears. See Figure 1c. Here the file name automatically appears as in the naming format of "Disc 10-31-2013_151603.VDD". The 10-31-2013 will vary with the date. The 151603.VDD part is program decided, and it presents in the Save As dialog as .VDD even though the "Convert data disc to ISO format" option is selected.
 |
| Figure 1c. Phantom Burner. Windows 7 64 bit Computer. Save As Dialog In Virtual Disc Setup For DVD-VIDEO ISO Disc Image. |
In this example at this stage with the destination DVD-VIDEO disc image .ISO format...
File name = Disc 10-31-2013_151603.VDD
Save as type = Virtual Disc Image
Media = DVD+RW
Option selected = Convert data disc to ISO format.
At the bottom of the Save As dialog is a Warning that reads:
Warning: ISO format provides maximum compatibility with various software. But you may lose some features supported by native virtual disc images (.VDD).
When "Save" of the Save As dialog is hit, one empty Disc 10-31-2013_151603.VDD file appears on the Desktop which was designated in the Save In: field of this Save As dialog.
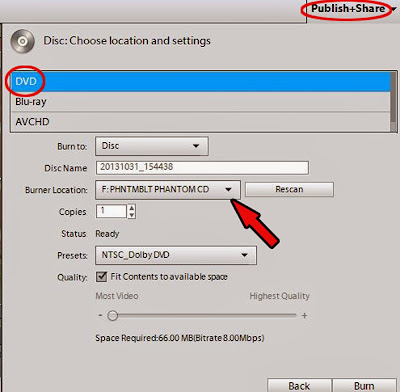
STEP 4. Open Premiere Elements 12 Expert workspace and set project preset manually to NTSC DV Standard. Import your project media, create your DVD-VIDEO standard project with menus. When you get to Publish+Share/Disc/DVD disc, in the burn dialog assure that your burner location = Phantom Burner Drive (F in this demo) and that the burn to preset = NTSC_Standard Dolby DVD. The Status should = Ready since you have already placed your virtual DVD+RW in the virtual Phantom Burner "tray". Hit Burn with the burn dialog as represented in Figure 1d.
 |
| Figure 1d. Premiere Elements 12. Publish+Share/Disc/DVD Disc. Burner Location = Phantom Drive F. Status Ready With Virtual DVD+RW Disc In This Virtual Burner. |
The .VDD disc image can be obtained in a similar manner by leaving unchecked the option for "Convert data disc to ISO format". Refer to Figure 1c.
STEP 5. Now what to do with that Disc 10-31-2013_151693.ISO file saved to computer desktop in order to get it on a real DVD disc as DVD-VIDEO?
Take this ISO disc image to DVD disc with ImgBurn (used version 2.5.7.0)
Here the settings are "Write image file to disc", followed by ImgBurn's File Menu/Browse for Source. In the case of the .ISO format, files of type = All Supported Files. Whereas, in the case of the .VDD format, files of type = All Files.
or
Take this ISO image to DVD disc with Nero (we have worked with only older versions such as 6 and 9).
The settings for 9 were Back Up, followed by Copy Disk, followed by automatic opening of Nero Express Essentials and selection of "Disk Image or Saved Project". These settings (under Supported Files) worked for the .ISO disc image. But they would not work for the .VDD disc image, even when setting for All Files. Error message was "Unexpected File Format".
Back in the days of Premiere Elements 7 and Phantom Burner, I wrote
5. This is what worked for me with the Nero StartSmart (version 6) whether the file was set up for ISO or VDD format:or
(a) Right clicked the file and selected “Mount in Phantom Burner”. That put our DVD-VIDEO virtual DVD+RW disc into the Phantom Burner. Now it was just a matter of copying that to a real DVD+RW or DVD-R disc which would play back on the computer as well as the TV via its TV DVD Player. The Nero settings that worked were:
Copy and Backup/Copy DVD
or
Copy and Backup/Burn Image to Disc/”Image, Project, Copy”/ “Copy Entire Disk”.
Any other Nero routes were problematic and resulted in failures. Needs more work.
6. This is what worked for me with Sonic Record Now (version 7) the settings were:
Drag and drop of the saved .iso or .VDD file was to Backup Projects/Burn Image.
Both the .iso and .VDD could be burned to a DVD+RW or DVD-R disc successfully. But it was only the one derived from the .iso file that the DVD player would accept and play back as DVD-VIDEO; whereas the Copy approach that made Nero doable did not work for Record Now.
7. ImgBurn (version 2.5.0.0) worked to produced DVD-VIDEO from both the .iso and .VDD formats. Here the settings were “Write image file to disc”, followed by File Menu/Browse for Source. In the case of the .iso format, files of type = All Supported Files did the job. Whereas, in the case of the .VDD format, files of type had to be set = All Files.
Right click the .VDD disc image and select "Mount in Phantom Burner" to mount it in the now empty Phantom Burner. Then import the VOBs into another Premiere Elements project via Premiere Elements Add Media/"DVD camera or computer drive"/Video Importer with Source field = Phantom Burner drive F in this case. This worked for the .VDD or .ISO disc image.
AVCHD
The principles and steps applied for the .VDD and .ISO formats for the DVD-VIDEO disc image are applicable to AVCHD on the virtual DVD+RW disc. This Phantom Burner Premiere Elements 12 setup included project preset = NTSC AVCHD Full HD1080i30 and Publish+Share/Disc/AVCHD disc with Presets = H.264 1920 x 1080i NTSC Dolby.
The results are the same as with DVD in that
- only one .VDD or .ISO file is generated in the Create Image stage
- All Phantom Burner Premiere Elements 12 burn to go to a "Burn Complete!" notification.
- After the "Burn Complete!" notification, the virtual DVD+RW is automatically ejected from the Phantom Burner
- ImgBurn can be used to take the .VDD or .ISO disc image to DVD disc, using ImgBurn's Open dialog's Supported Files for .ISO disc image import and All Files for .VDD disc image import. Like DVD, Nero 9 could be used to take the AVCHD disc image ISO to DVD disc, but could not do that with the AVCHD disc image .VDD ("Unexpected File Format" Error)
- Whereas DVD-VIDEO disc image .VDD or .ISO seem to work for getting getting VOBs into a Premiere Elements 12 project for use as source media, the AVCHD DVD disc image .VDD worked to import .m2ts file, but .ISO did not ("Error Copying Files").
Blu-ray
The principles and step applied for the .VDD and .ISO format for the DVD-VIDEO and AVCHD disc image are applicable to Blu-ray on the virtual Blu-ray disc. This Phantom Burner Premiere Elements 12 setup included project preset = NTSC AVCHD Full HD1080i30 and Publish+Share/Disc/Blu-ray disc with Presets = H.264 x 1080i NTSC Dolby.
The end results were the similar, but differed in several respects from those from the DVD and AVCHD work.
- Most significant is the Phantom Burner Premiere Elements 12 burn to resulting in a "device error" at the end of the burn to. However, if "Cancel", followed by "acknowledgement of Cancel", are clicked in the burn area, the Blu-ray disc image is found intact and ready for use in the hard drive save location established back in the Create Image stage.
- The virtual BD-RE does not automatically eject as it does in the cases of the virtual DVD disc for DVD-VIDEO and AVCHD.
- If Save As (Figure 1c) is set for BD-RE and "Convert data disc to ISO format" is left unchecked so that the .VDD format is produced, then two files present as saved on the Desktop, one named Disc 10-31-2013_151603.VDD and the other Disc 10-31-2013_151603.VDD.001. (When all is said and done, the .VDD one has a file size of 1.3 GB; whereas the .VDD.001 one has a file size of 0 bytes.) By contrast, when set for BD-RE and "Convert data disc to ISO format" is selected to obtain the .ISO disc image, two files present as saved on the Desktop, one named Disc 10-31-2013_151603.VDD and the other still Disc 10-31-2013_15603.VDD.001. It is only after the virtual BD-RE disc is manually ejected from the Phantom Burner that the .VDD file extension is automatically changed to .ISO for the Disc 10-31-2013_151603.VDD file, while the .VDD.001 file remains as is.
- Preliminary indications are that the presence of the .VDD.001 is needed to import the .VDD as source media into Premiere Elements to get the .m2ts, but only the VDD is needed if ImgBurn or the like is to take the .VDD or .ISO disc image to disc.
- Like DVD and AVCHD, ImgBurn can be used to take the .VDD or .ISO disc image to BD-RE disc using ImgBurn's Open dialog's Supported Files for .ISO disc image import and All Files for .VDD disc image import. Like DVD, Nero 9 could be used to take the Blu-ray disc image ISO to BD disc, but could not do that with the Blu-ray disc image .VDD ("Unexpected File Format" Error)
- Whereas DVD-VIDEO disc image .VDD or .ISO seem to work for getting getting VOBs into a Premiere Elements 12 project for use as source media, the Blu-ray disc image .VDD worked to import .m2ts file, but .ISO did not ("Error Copying Files"). The latter behavior was similar to that seen for the AVCHD DVD disc image in this regard.
COMMENTARY
Lots of variables, but interesting end results whose applicability needs to be explored in different Premiere Elements Phantom Burner computer environments. To date, the Phantom Burner Premiere Elements 12 setup on Windows 8 or 8.1 64 bit cannot be used for AVCHD or Blu-ray disc image since Premiere Elements 12 burn dialog's Status = Media Not Present. In this instance it is not recognizing the virtual DVD+RW for AVCHD nor the virtual BD-RE for Blu-ray while it does recognize the virtual DVD+RW for DVD. More work to do.
The work presented here has been road tested many times, looking for inconsistencies in the results. Since the results posted in this blog post have been consistent over many runs in my computer environment, I am publishing these results for consideration.
_______________________________________________________________________________
*Premiere Elements is being used as a generalization in this sentence. Premiere Elements 4 through 12 have burn to disc or folder for DVD and only burn to disc for Blu-ray. AVCHD burn to DVD disc or folder opportunity was introduced in version 10 and therefore exists or folder exists for only for versions 10, 11, and 12.
**UPDATE January 8, 2015. The original link to the Phantom Burner 2.0 used when this blog was written is no longer working to obtain the Phantom Burner 2.0 and has been replaced this day with a link that is working to obtain the Phantom Burner 2.0 tryout download (phantomburner_setup.exe). This new link seems to be working to obtain the "Phantom Burner 2.0", but the Learn More and Purchase buttons for this choice do not work. Interestingly, the old and new links are from the same web site, just different pages of the web site. At this time, it is not known if this reflects problem with the PHANTOMbility.com web site or something else.***
***IMPORTANT UPDATE March 1, 2016. Please refer to the following
http://atr935.blogspot.com/2016/03/pe-iso-images-burn-to-opening-virtual.html
regarding the Phantom Drive as a possible replacement for the Phantom Burner.
ATR