Premiere Elements 11 user had a project with 18 movies in its Expert workspace Timeline destined for DVD-VIDEO on DVD disc with the Slideshows/Pan and Zoom disc menu theme. The question was how best to navigate those 18 movies with the TV Remote at play back of the end product DVD-VIDEO on DVD disc. A single main menu scheme was envisioned, but there were not enough buttons on the main menu page for that without ending up with 18 Main Menu pages.
The Slideshows/Pan and Zoom disc menu theme has on its Main Menu page one Play Movie text button, one Scenes text button (to get to the Scene Selection page), and one Main Menu 1 text button (a bonus type button). Refer to Figure 1.
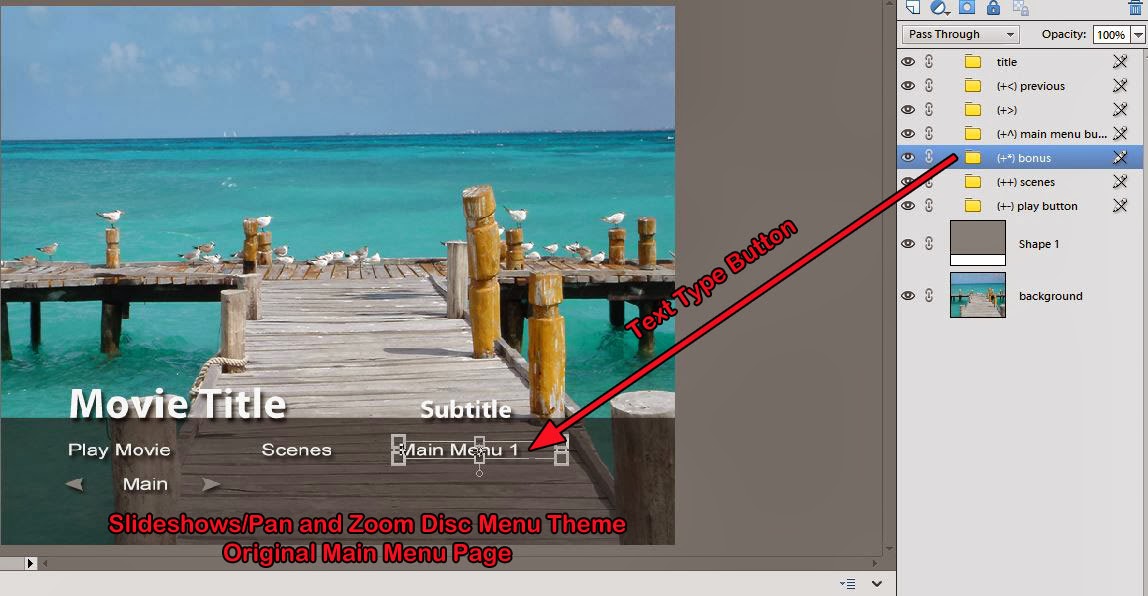 |
| Figure 1. Slideshows/Pan and Zoom Original Main Menu Page, Demonstrating A Text Type Button For Main Menu 1 (Bonus) Entry. View From Photoshop Elements Version Which Is Not Able To Open The Layer Sets In The Layers Palette Of The Theme's .Psd File. |
The Scene Selection page has 6 scene thumbnail buttons per page. Refer to Figure 2.
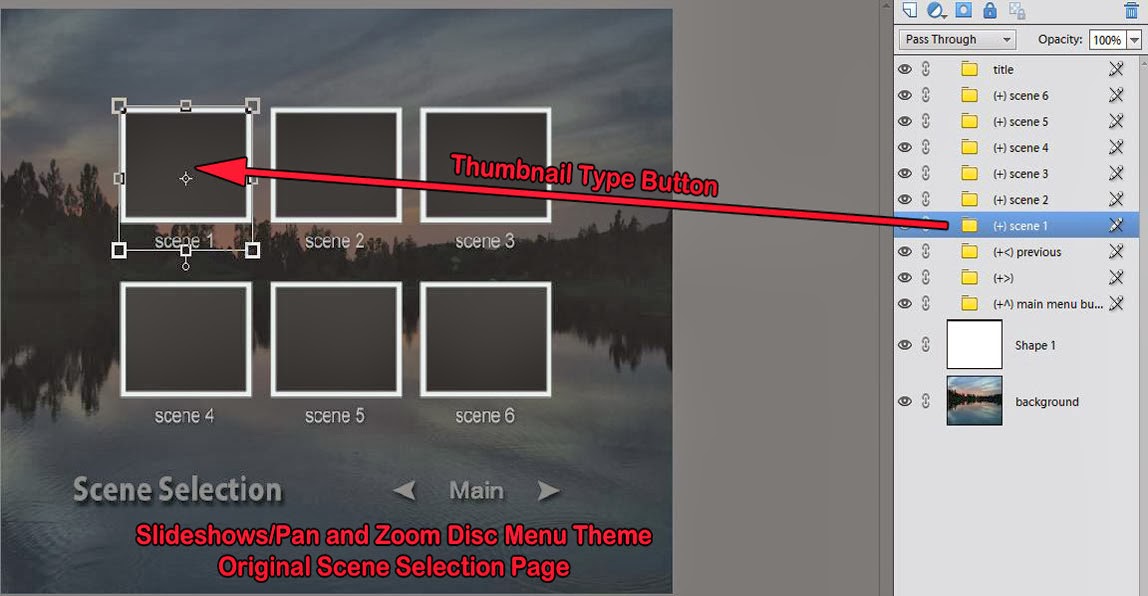 |
| Figure 2. Slideshows/Pan and Zoom Original Scene Menu Page, Demonstrating A Thumbnail Type Button For Scene 1 Entry. View From Photoshop Elements Version Which Is Not Able to Open The Layer Sets In The Layers Palette Of The Theme's .Psd File. |
The focus of this blog post is on possible Main Menu schemes and principles to accommodate this users specific disc menus needs.
"Adding movie buttons" to the Main Menu page could be accomplished by either of two possible ways
- Renaming the theme's Main Menu and Scene Menu .psds files to switch them, effectively giving a Main Menu page with 6 thumbnail buttons, instead of the original's 1 text type button.
- Multiple copying of the "Main Menu 1" major Layer Set in the Layers Palette of the Main Menu .psd file, effectively giving a Main Menu page with 6 text buttons instead of 1.
ISSUES
Renaming the theme's Main Menu and Scene Menu .psds files to switch them, effectively giving a Main Menu page with 6 thumbnail buttons, instead of the original's 1 text type button.
This could be done very easily using Photoshop Elements or Photoshop CS or higher since the specified task (6 thumbnail buttons per page) does not require the opening of the Main Menu .psd file's Layer Sets. More than 6 thumbnail buttons per Main Menu page is possible by multiple copying of Layer Set. But the copying process is associated with an error within the Layer Set which requires Photoshop CS or higher to correct. The error in these copies involves the (^^) subLayers of the Layer Set presenting with the incorrect title of (^) instead of correct (^^).
Multiple copying the "Main Menu 1" major Layer Set in the Layers Palette of the Main Menu .psd file, effectively giving a Main Menu page with 6 text buttons instead of 1.
This choice would definitely require use of Photoshop CS or higher since copies of "Main Menu 1" major Layer Set would introduce the (^) error that needs correction in the opened Layer Set of the .psd's Layers Palette.
SOLUTION
Possible solutions to the disc menu choices will be demonstrated by way of the following how tos.
HOW TO
Renaming the theme's Main Menu and Scene Menu .psds files to switch them, effectively giving a Main Menu page with 6 thumbnail buttons, instead of the original's 1 text type button.
STEP 1
Determine the Slideshows/Pan and Zoom theme's .psd files to be modified
Go to Local Disc C\Program Files\Adobe\Adobe Premiere Elements 11\DVD Templates\Common\Slideshows\Pan and Zoom\ and in the Pan and Zoom Folder will be the theme's assets as shown in Figure 3.
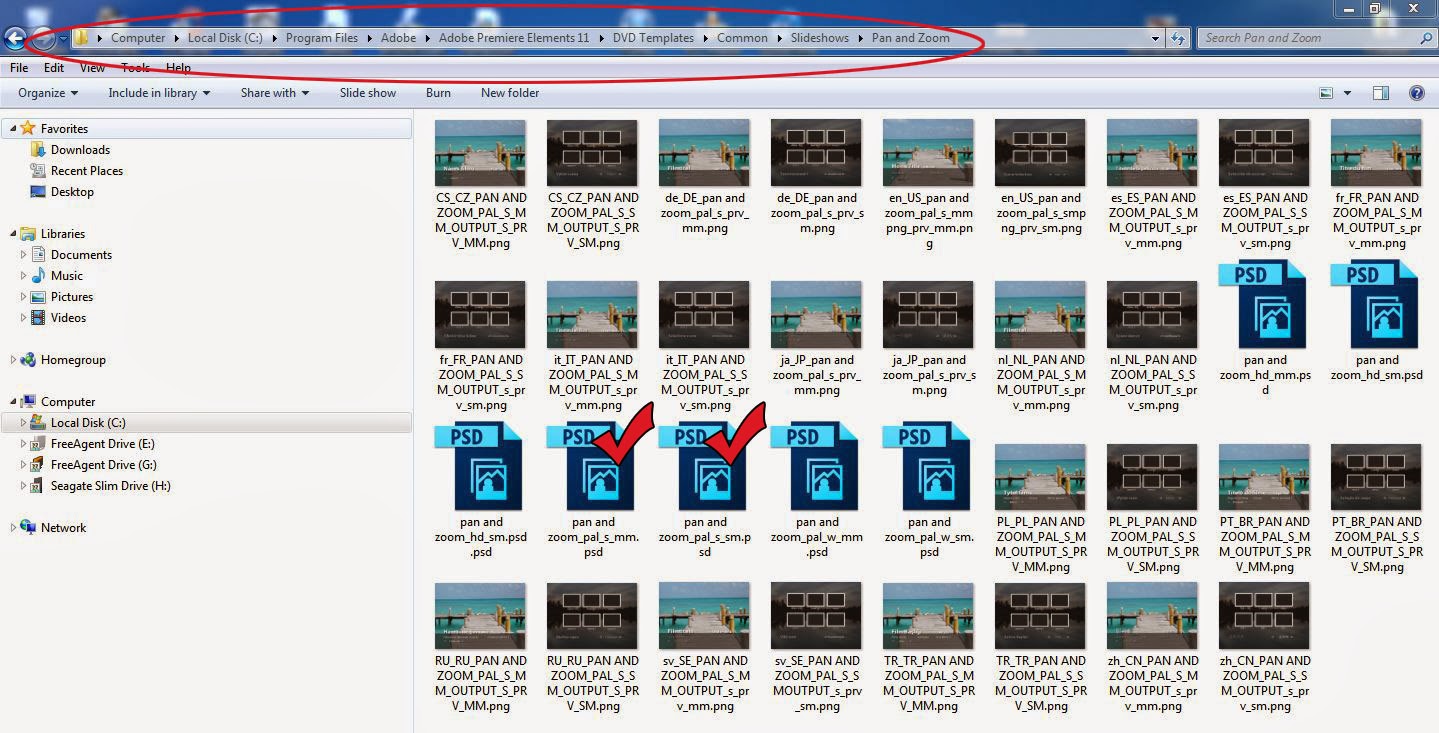 | |
| Figure 3. Slideshows/Pan and Zoom Assets. |
If DV Standard project preset, the set used is
pan and zoom_pal_s_sm.psd
and
pan and zoom_pal_s_mm.psd
If DV Widescreen project preset, the set used is
pan and zoom_pal_w_sm.psd
pan and zoom_pal_w_mm.psd
If one of the HD project presets, the set used is
pan and zoom_pal_hd_sm.psd
pan and zoom_pal_hd_mm.psd
Since the blog post example is using the DV Standard project preset, the set
pan and zoom_pal_s_sm.psd
and
pan and zoom_pal_s_mm.psd
will be copied to the computer desktop and placed in a folder created for them there. STEP 2
Switch the file name of the menu menu and scene menu .psd files, and add a special at the start of the name to differientate them from other files, and place the renamed .psd files in a desktop folder which has a name corresponding to the files.
Change the name of pan and zoom_pal_s_sm.psd to specialpan and zoom_pal_s_mm.psd
Change the name of pan and zoom_pal_s_mm.psd to specialpan and zoom_pal_s_sm.psd
Name the Folder in which these files are to go specialpan and zoom.
STEP 2a
Replace the Background Layer now in the file named specialpan and zoom_pal_s_mm.psd file with the Background Layer now in the file named specialpan and zoom_pal_s_sm.psd file.
In Photoshop Elements open the specialpan and zoom_pal_s_sm.psd, turn off the Visibility Icon for all the Layers except the Background, Save Background as jpg file to the computer desktop.
 |
| Figure 4. Slideshows/Pan and Zoom Main Menu Original Background As Jpeg Copy Used In Main Menu Scene Menu Switching. |
Then, in Photoshop Elements, open the specialpan and zoom_pal_s_mm.psd, and import into it the Jpeg background, making sure to have it at the bottom of the Layers Palette and named Background. Delete the original Background. Save changes.
STEP 3
Place the specialpan and zoom Folder in the Program Files to Slideshow Folder route cited below.
Local Disk C
Program Files
Adobe
Adobe Premiere Elements 11
DVD Templates
Common
Slideshows
STEP 4
Place Main Menu markers in the Timeline content for each of the movies. The movie thumbnails in the Main Menu page will trace back to the locations of those Main Menu markers on the Timeline. Customize the Main Menu page in the disc menu section of the opened project.
The type of customization that can be done is shown in Figure 4. In case of the 18 Main Menu markers on the Timeline, the project would have 3 Main Menu pages, each with 6 thumbnails buttons. Renaming on the 6 thumbnail buttons on each of Main Menu pages 2 and 3 would be indicated.
Important Note: When there are only 6 Main Menu markers on the Timeline and this 6 thumbnail buttons per page Main Menu page is used, there will be no page navigation tools seen (previous, next, and "main" in between previous and next). The navigation tools will appear on the first and subsequent pages only when the number of Timeline Main Menu markers exceeds the number of designed in buttons per page (6).
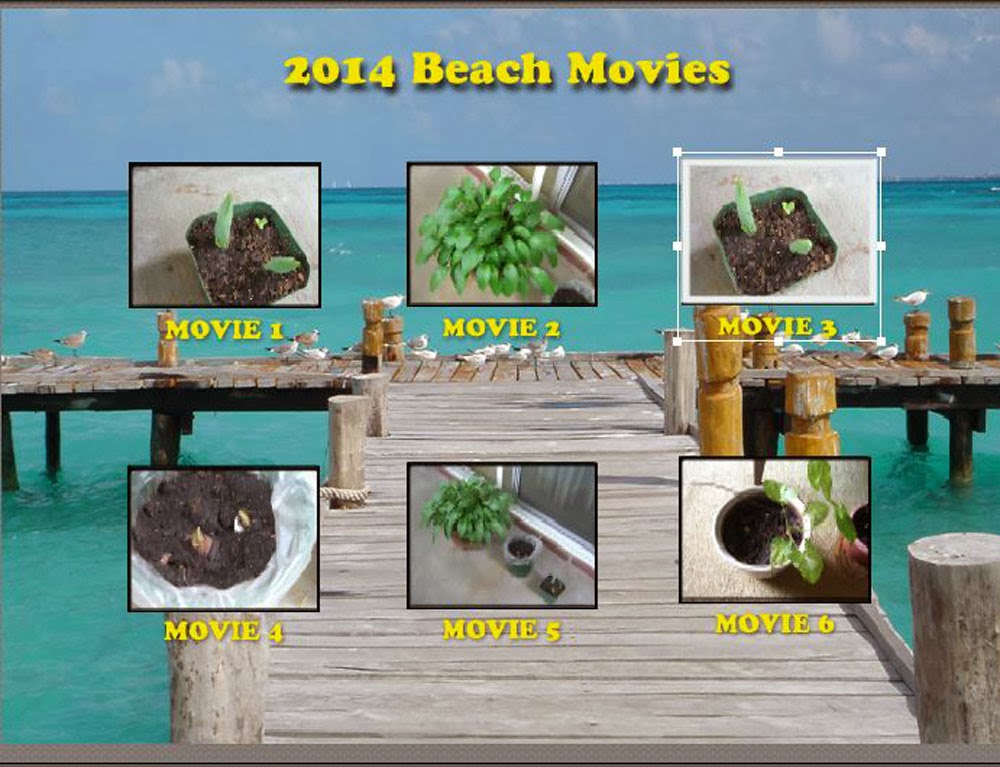 |
| Figure 4. Slideshows/Pan And Zoom Main Menu With 6 Movie Thumbnails And Customized. No Previous-Main-Next Is Shown In This Figure Since The Screenshot Was Taken When There Were Only 6 Timeline Main Menu Markers, Consequently No Addition Pages Beyond Page 1. See Important Note In Body Of Blog STEP 4. |
Multiple copying the "Main Menu 1" major Layer Set in the Layers Palette of the Main Menu .psd file, effectively giving a Main Menu page with 6 text buttons instead of 1.
STEP 1
Determine the Slideshows/Pan and Zoom theme's .psd files to be modified
Same as described above.
STEP 2 and STEP 2a
Skip STEP 2 and STEP 2a.
No switching or replacing.
STEP 3
Open the Main Menu .Psd in Photoshop CS or higher and, if making a 6 text buttons per Main Menu page, make 5 more copies of the (+*) bonus Layer Set in the Layers Palette (making sure that the copy error of ^ is corrected to ^^ for each Layer Set subLayer Set.
Important Note: The Layer Set in the Layers Palette named (+*) bonus represents the Main Menu 1 button.
Position the text buttons on screen. But leave the text as is and edit the text in the opened Premiere Elements movie menu customization area. Save the edited .psd file. And then place the specialpan and zoom Folder in the Slideshow Folder as described in STEP 3 above.
STEP 4
Customize the Main Menu page in the movie menu section of the opened Premiere Elements project.
The Main Menu page with 6 text buttons per page was created and customized. Those results are not shown. Instead the results with a 9 text buttons per page Main Menu are described and displayed in Figure 5 and Figure 6.
When there were 9 main menu markers placed on the Timeline and the edited Main Menu 9 text buttons per page was opened in the movie menu customization area of the project, the main menu displayed as seen in the saved .psd (names of buttons being the generic Main Menu 1 for each of the 9 buttons). And, there was a Play Movie Button there which was not going to be used. See Figure 5.
 | ||
| Figure 5. Slideshows/Pan and Zoom Theme Main Menu Edited To Display 9 Text Buttons Per Main Menu Page. View When Menu Was First Applied To Project With 9 Main Menu Markers On The Timeline. |
- Generic text button names were given names applicable to the project theme
- An Appropriate Title and Subtitle was given the page
- The Play Movie Button was removed since no play all command wanted.
In this example, the customized Main Menu page 1 displayed as seen in Figure 6.
 |
| Figure 6, Slideshows/Pan and Zoom Theme Main Menu Edited To Display 9 Text Buttons Per Main Menu Page. View Of Customized Main Menu For Project With 9 Main Menu Markers On The Timeline. |
Again IMPORTANT to remember about the page navigation tools (previous, next with "main" in the middle)...
The navigation tools will appear on the first and subsequent pages only when the number of Timeline Main Menu markers exceeds the number of designed in buttons per page, in this case, 9. Figures 5 and 6 are screenshots when these page navigational tools were not shown because there were no additional pages beyond the first since 9 Timeline Main Menu markers - 9 text buttons per Main Menu page.
_____________________________________________________________________________
For more information of Premiere Elements Disc Menus, please refer to the prior blog posts here
PE: Scene Menu Customization/Decreasing Existing Scene Buttons Per Page
http://www.atr935.blogspot.com/2014/02/pe-scene-menu-customizationdecreasing.html
PE: DVD Menu Navigation/Play All Loss
http://www.atr935.blogspot.com/2013/09/pe-dvd-menu-navigationplay-all-loss.html
PE: One Page 14 Scene Buttons DVD Menu
http://www.atr935.blogspot.com/2013/05/pe-one-page-14-scene-buttons-dvd-menu.html
September 03 2014 Add On
Also see blog post
PE: Disc Menu Folders/Files Locations
http://atr935.blogspot.com/2014/09/pe-disc-menu-foldersfiles-locations.html
ATR
No comments:
Post a Comment