Premiere Elements (any version) has project presets for only SD and HD video 4:3 and 16:9 in the landscape orientation. The question was raised at the forum level whether or not it is possible to import, edit, and export portrait oriented video and maintain the portrait orientation without black borders throughout workflow.
ISSUE
Since there is no project preset for portrait oriented video source, what to do? And, if such a project preset were to be created at the user level, would it work to create the portrait oriented space in the Edit area monitor from which to edit the portrait oriented video import without black borders? And, could the edited Timeline portrait oriented content be exported to a portrait oriented video file saved to the computer hard drive?
SOLUTION
Using Premiere Elements 12/12.1 for this feasibility study, a portrait oriented 1080 x 1920 9:16 project preset was created by editing the Notepad document of the existing 16:9 Adobe DSLR 1080p30@29.97.sqpreset file.
When this newly created project preset was used, portrait oriented video could be imported, edited, and exported using a Premiere Elements 12/12.1 project. And, the portrait orientation was maintained throughout the workflow. Previewing of the edited Timeline portrait oriented content in the Edit area monitor is an unresolved issue. If the Timeline content is rendered to get the best possible preview at the Edit level, the video displayed in the Edit Area monitor squeezes in resulting in black borders to the left and right of the video image on screen.
HOW TO
Creation of the 9:16 Project Preset
1. Find the DSLR 1080p30@29.97.sqpreset file.
Local Disk C\Program Files\Adobe\Adobe Premiere Elements 12\Settings\
SequencePresets\NTSC\DSLR\1080p\
and in that 1080p Folder is the DSLR 1080p30@29.97.sqpreset file that is to be copied.
2. Copy the DSLR 1080p30@29.97.sqpreset file and paste it into a newly created desktop folder named 1920p. Change the name of the DSLR 1080p30@29.97.sqpreset file inside the folder to DSLR 1920p30@29.97.sqpreset.
3. Open the 1920p Folder and edit the .sqpreset file in Notepad.
To do that, right click the .sqpreset file, and, from the drop down menu, select Open With and then Notepad.
4. In the Notepad document, there are two essential places that need editing to bring about the landscape to portrait orientation change in the workspace. One is at the top of the Notepad document, and the other is at the bottom of the document.
At the top
From
<PreviewVideoFrameSize>0,0,1920,1080</PreviewVideoFrameSize>
To
<PreviewVideoFrameSize>0,0,1080,1920</PreviewVideoFrameSize>
At the bottom
From
<VideoFrameSize>0,0,1920,1080</VideoFrameSize>
To
<VideoFrameSize>0,0,1080,1920</VideoFrameSize>
See Figures 1 and 2
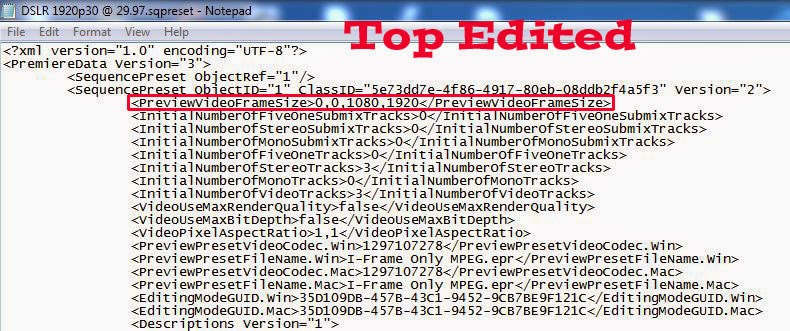 |
| Figure 1. Sqpreset Notepad Document Essential Edit At Top Of Document |
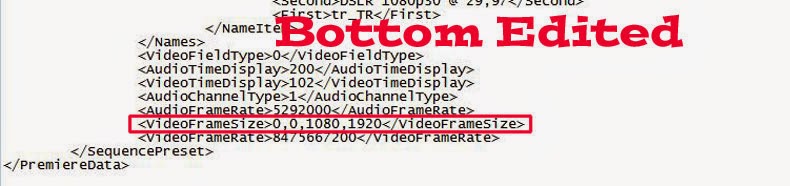 |
| Figure 2. Sqpreset Notepad Document. Essential Edit At Bottom Of Document. |
In order to get the description of the new project preset to present correctly within the opened Premiere Elements project, then edits of the Description line can be made for the specific language assigned to the computer. See <Descriptions version = "1"> line at the bottom of Figure 1, and change the details to read for your language. Here the example is for English. The places of change are in bold text with orange background color.
<Descriptions Version="1">
<DescriptionItem
Version="1" Index="0">
<Second>For
editing most DSLR Formats (like the Canon EOS Movie Full
HD series) recorded in 1080x1920 square pixels (non-
HD series) recorded in 1080x1920 square pixels (non-
anamorphic). 9:16 Progressive HD video at 29.97 frames
per
second. 48 kHz audio.</Second>
<First>en_US</First>
Then go to specifically File Menu/Save of the Notepad document and hit Save. Then File Menu/Exit.
5. At this point, you have the edited sqpreset file in the 1920p Folder on the computer desktop.
(Change the name of the edited sqpreset file so that it = DSLR 1920p30@ 29.97)
Move the 1920p Folder from the desktop to the DSLR Folder in the Program Files path cited above and shown in Figure 3. Close out of there.
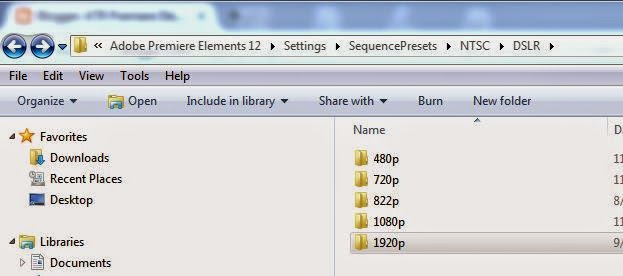 |
| Figure 3. Placement Of The 1920p Folder Containing The New 9:16 Project Preset In DSLR Folder In Path Local Disk C\Program Files\Adobe\Adobe Premiere Elements 12\Settings\SequencePresets\NTSC\DSLR. |
The Premiere Elements 12/12.1 Project Using The Newly Created 9:16 Project Preset
6. Back in the Premiere Elements 12/12.1, manually set the project preset to the new project preset.
See Figure 4 for Change Settings which now includes the new 9:16 project preset under the NTSC/DSLR/1920p/ accessed File Menu/New/Project.
 |
| Figure 4. New DSLR 1920p30@29.97 Project Preset Available In Change Settings. Note Description Of New Project Preset In The Right Column Of Change Settings. |
The selection of the new DSLR 1920p30@29.97 progressive frames per second project preset should have the corresponding details in Edit Menu/Project Settings/General. See Figure 5.
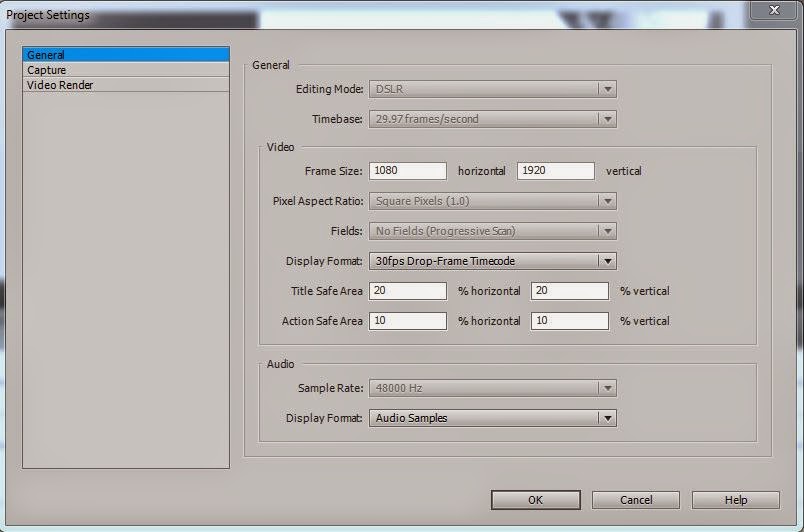 |
| Figure 5. Project Settings Dialog After Setting Project Preset To New DSLR 1920p30@29.97. |
When you import your 1080 x 1920 9:16 video file into the project set to that new project preset and drag it to the Timeline, you should see what is displayed in Figure 6 screenshot.
 |
| Figure 6. AVCHD.Mp4 1080 x 1920 @ 29.97 Progressive Frames Per Second File Imported Into Premiere Elements 12/12.1 Project With Project Preset = NTSC/DSLR/1920p/DSLR 1920p30@29.97. |
Note that the video imports with no colored line over its content. Once edits are applied to that Timeline video, an orange line will appear over that Timeline content. DO NOT RENDER. See detail on that in SOLUTION introduction.
The edited Timeline content was successfully exported to AVCHD.mp4 1080 x 1920 @ 29.97 progressive frames per second, using Publish+Share/Computer/AVCHD with Presets = MP4 H264 1920 x 1080p30 and the export setting customized to 1080 x 1920 under the Advanced Button/Video Tab of the preset. See Figure 7.
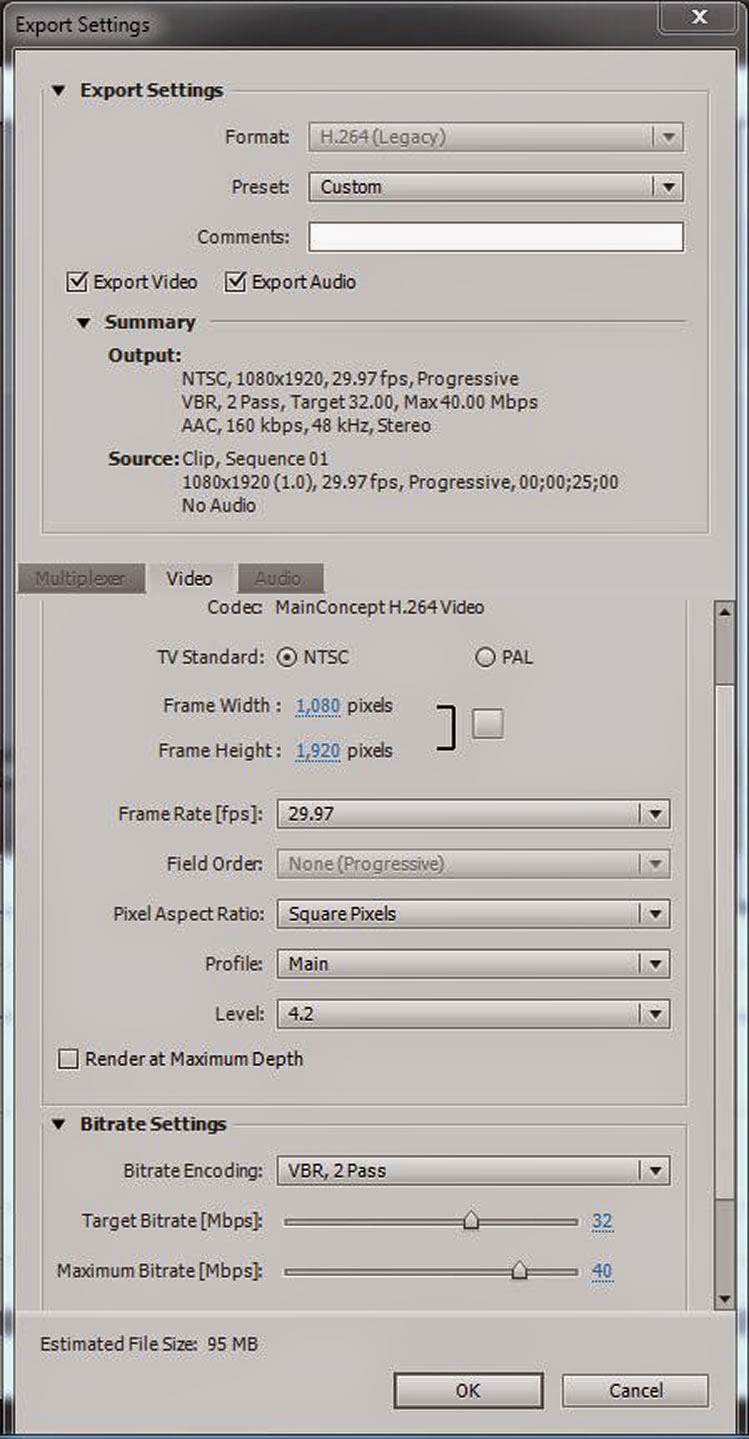 | ||||
| Figure 7. Export Settings For 1080 x 1920 File From Premiere Elements 12/12.1 1080 x 1920 Project. |
Playback of the 9:16 Export of the 9:16 Timeline Content
7. The video looked great in QuickTime in a portrait orientation (no black borders) and has been uploaded to this blog post to determine how it would display here.
The Blogger Player played back the 1080 x 1920 @29.97 progressive frames per second as a portrait oriented video with large black borders to the right and left of the image. The same was seen when the video was played back on the computer's VLC Player and Windows Media Player. To the contrary the QuickTime Player displayed this video in portrait orientation without black borders when using variety of its viewing options.
When this 1080 x 1920 @29.97 progressive frames per second movie was imported into iTunes Library, its thumbnail was portrait oriented. See Figure 8. But, when this movie was played back there in the iTunes player, the display was like that of VLC Player and Windows Media Player, that is, portrait oriented with black borders to the right and left of the image.
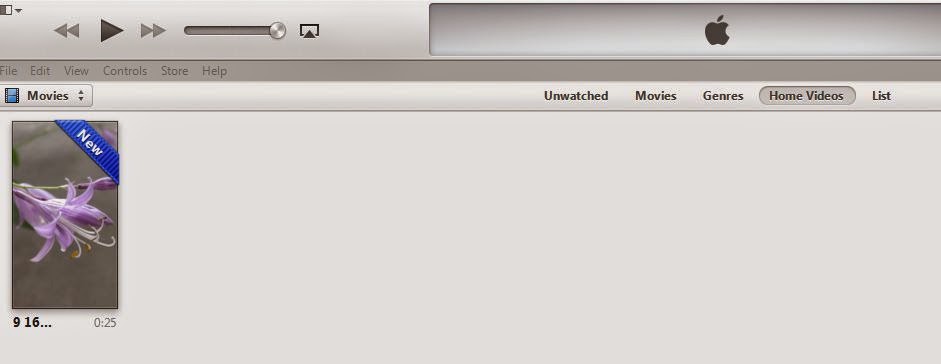 |
| Figure 8. The 1080 x 1920 @ 29.97 Progressive Frames Per Second Movie Imported Into iTunes Library/Movies/Home Videos. |
COMMENTARY
This feasibility study answered some major questions
Yes for "Can a project preset be created at the user level which would work to create the portrait oriented space in the Edit area monitor from which to edit the portrait oriented video import without black borders?"
Yes for "Could the edited Timeline portrait oriented content be exported to a portrait oriented video file saved to the computer hard drive?"
And, the QuickTime Player appears to be a good choice for play back of the 9:16 export from the 9:16 project preset. But, much needs to be done regarding a device's sync to 9:16 movies that were imported into the iTunes Library.
Problems related to rendering the Timeline 9:16 content in the Edit area remain unresolved, but, in these studies, this did not have any impact on the 9:16 end product from the 9:16 project. If you render the 9:16 Timeline content in Edit area, the results are meaningless, and, if you do not render the 9:16 Timeline content in Edit area, it makes no difference to the 9:16 end product.
________________________________________________________________________________
ATR
Continuing Investigation